I’ll skip the lame “modifications” like my handlebars, my seat, my phone holder, the stickers on my bike, and all such mods and get to the really important things.

After many months of soul searching, I decided to take a leap into the unknown with my Super73 S1. My eBike is/was great as is, but with the influx of new models from Super73 as well as the ever-booming eBike market I was slowly falling behind (literally and figuratively). I’m definitely not the type of person to sell the bike I have (for a loss) just to spend even more money, so I decided to overhaul my electronics.

With the help from Danny from eDriftTrikes.com I ripped out the stock speed controller on my bike and opted to replace it with a very nice piece of kit. Danny and I chatted a bit and after listening to my overall goals for my bike, he recommended the Grin Technologies Phaserunner coupled with their Cycle Analyst Display.

Yes I said words and here is where I’ll explain what they mean!

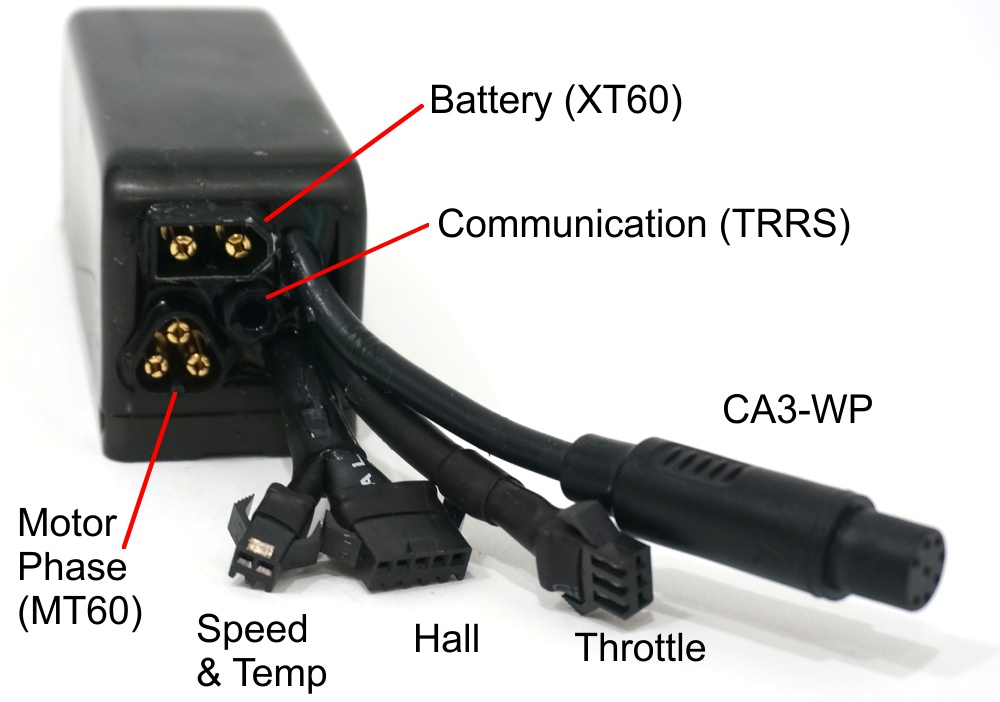
The Phaserunner is a high-end field-oriented speed controller capable of running whatever motor I could dream of putting on my eBike. It is capable of running any battery from 20V all the way to 90V and let’s face it, I’m not really shooting for the moon with my Super73 S1.

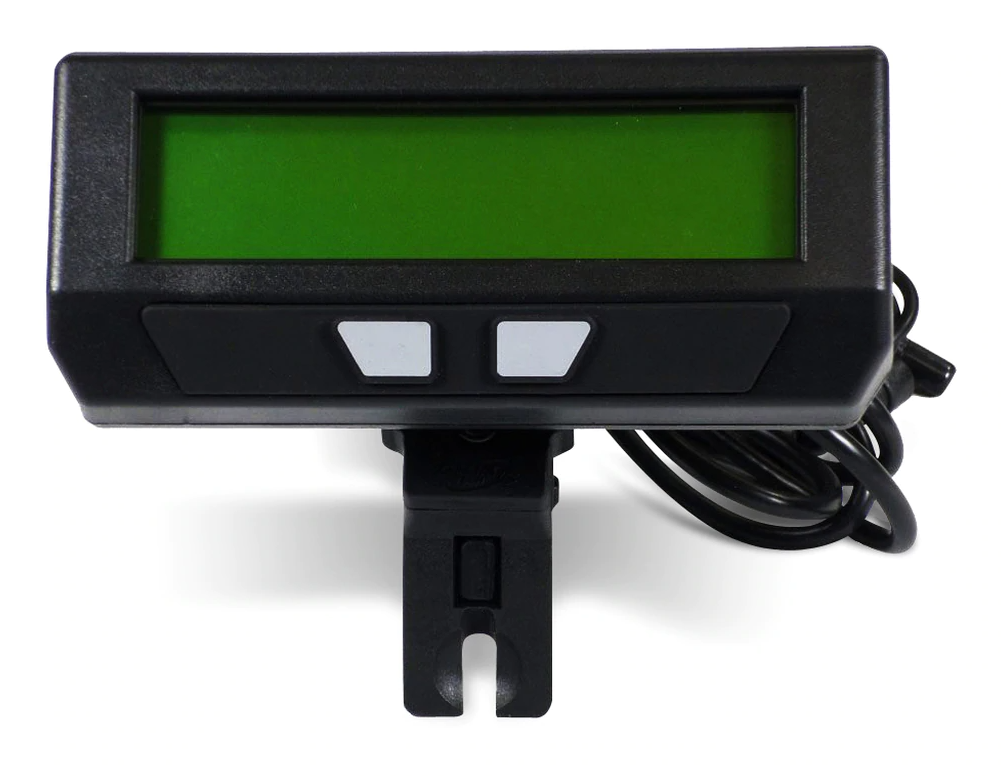
The Grin Technologies Cycle Analyst is a display that’s made specifically to work with the Phaserunner and displays a plethora of stats like speed, power, battery voltage, amp draw, and motor temp just to name a few. Together they give me a platform to endlessly change the motor and battery on my eBike and even give me the option of moving it to another PEV.

Onwards!

With the ever-growing popularity of the 48V controller mod for the Super73 Z1 (I call it the Z2 mod), I viewed this setup as a more refined and more reliable version of that mod. Having these electronics on my bike would not only let me push the limits of my motor, but it would allow me endless adjustability so that I could fine tune the motor to my riding style.

Danny took care of the install and initial tuning of the new electronics while I took care of paying him for his outstanding quality of work. Not only does Danny do FANTASTIC work, he squeezed my build in and did on a very tight time-line. If you’re looking to go faster, Danny is the guy to talk to. He’s a distributor for all products offered by Grin Technologies and has a wealth of knowledge on what motor, battery, and settings produce the most reliable results.

Cool! So How Fast Can You Go?

Well after the first phase of this modification I was a bit underwhelmed; not with the work that was done, but with the current limit of my battery. Although I was able to reach 28 MPH, but I could only do so on a freshly charged battery and an ideal riding surface. At first I felt like I ruined my bike’s range, but thinking back on that it was the expected outcome of wanting more speed. This eased me for a bit since my initial range was 25-35 miles, after the mod it dropped to 15-25

My top speed was still hitting a hard limit since I asked Danny to program a power limit according to my stock battery’s capabilities. Once winter set in I did a bit more soul-searching and decided to make another large jump into the unknown. It’s common knowledge that upping the voltage on my battery would give me a performance boost, and since I wanted to find the limits of my stock motor without breaking the bank I decided to move to a 52V battery.

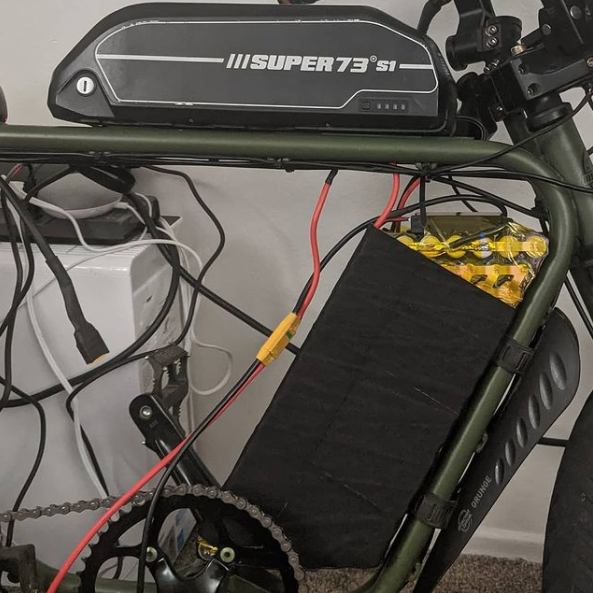
What I came up with after talking with my good friend Nak-Attack, we ended up building a 52V battery using 21700 cells. The main reason for moving away from 18650 cells is because they couldn’t provide both the capacity and power I needed to feed my new electronics.

My old battery is a 48V 14.5Ah pack in a 13S4P configuration that provided me with nearly 700 watt hours. My new battery is a 52V 33.6Ah pack in a 14S5P configuration which provides over 1700 watt hours which is well over DOUBLE the amount of capacity and yes that means over double the range!

Practical Range Comparison

Single 48V Battery (696 watt hours): 15-25 miles w/ 27 MPH top speed
Single 58V Battery (1700 watt hours): 40-100 miles w/ 32 MPH top speed

The running theory is that your power and speed increase proportionately to your battery voltage, so jumping from 48V to 52V should yield at least an 8% increase in speed and acceleration and in my case I obtained much greater results.

Why? I’ll tell you!

This Basic Math Problem Is Breaking the Internet

My stock battery was capable of delivering 48V multiplied by a max amperage of 25-amps resulting in a max power of 1200W of power. By simply switching to a 52V battery and without changing anything else on the controller that gave me a measly increase to 1300W. I gained MAYBE 1-2 MPH of top end speed and can vouch for a noticeable increase in acceleration, but you may still be asking yourself if that was it. It wasn’t >:)

I mentioned before that I had my bike tuned to the limitations of my stock battery. I’ll admit that I forgot all about that and thought I had made another costly mistake for little gain. WRONG! After realizing why I wasn’t getting the most out of my new battery I promptly connected my eBike to my laptop and dialed in more power.

My controller was set to cap the power at 1300W and only allow 25-amps of power from the battery. After talking to other folks that are pushing the envelope on their stock Super73 motors I confidently turned up my settings to allow 1750W of power and allowed the controller to pull 35-amps from the new 52V battery.

I was able to dial in more power because the new 52V battery pack was built for that very purpose. The pack that was built is capable of putting out 105-amps by itself, but I regulated it using a 60-amp BMS. Theoretically I can tell my controller to pull that much from the battery, but I am CERTAIN my motor will burn and that the phase wires will melt. Nehooz.

With the taps opened up a considerable amount I am now able to reach 33MPH on a freshly charged battery, and maintain an average speed of 30MPH throttle only. At first glance big whoop right? WRONG.

Using a more capable speed controller coupled with a stronger battery I was able to obtain over 25% more top speed over the stock controller my eBike shipped with and a very noticeable increase in acceleration.

I have a 2-amp, 4-amp, and a 5-amp charger for my Super73S1 eBike. Through meticulous data collecting an analysis I’ve made very interesting correlations between expected charge time versus actual charge time.

2 Amp Charging

This is a standard charger that comes with most eBikes and is available from Super73 for $80. If I rode my ebike with its 48V 14.5Ah battery until it ran out of power, it would take about 7 1/2 hours to charge back to full. From all my data logging I found that my 2 Amp charger actually does it in less time being anywhere from 10-15% quicker! But before I start painting a picture let’s go over the stats on the rest of my chargers

5 Amp Charging

This is the fast charger that came with my Super73 eBike, but is also available from their website for $150. Although this charger can charge over twice as fast as the standard charger, in practice it was definitely less efficient. To charge my 14.5Ah battery completely it should theoretically take a bit shy of 3 hours. In practice I found that this was not the case. On average the fast charger would take 35-50% longer to charge than it should which was very surprising; charging my battery from 50% should only take 1 hour and thirty minutes and on average took an additional 30-45 minutes! We’ll get into this more later.

4 Amp Charging

I found a 4 Amp charger for my eBike at a VERY economical price. I bought a $40 charger from Amazon and then chopped the proprietary plug for Super73 eBikes and soldered it to the charger. Although I haven’t had this charger long, I’ve used it enough to measure its efficiency. Doing the math my 14.5Ah battery charging at 4-amps an hour should take about 3 hours and 40 minutes. On average this one charges and balances the battery 5-10% faster!

Head to Head

For this example we’ll assume the battery is charging from 50% (7.25Ah) and compare the estimated charge times to the actual.

(estimated charge time :: actual charge time)

Standard Charger (2A)
3 Hours 38 Minutes :: 3 hours
Fast Charger (5A)
1 Hours 27 Minutes :: 2 Hours 10 Minutes
Aftermarket Fast Charger (4A)
1 Hour 49 Minutes :: 1 Hour 27 Minutes

In Short, the slow charger isn’t REALLY that much slower compared to the fast charger (at least in my case)

What does this all mean?

Absolutely nothing! I’ve always been in the practice of only using a “fast” charger on group rides where charging is available. All other times I will use my 2 Amp charger. Charging at a high rate causes the battery to heat up and anytime the battery experiences heat for long periods of time you’re hurting the battery, but it definitely shortens the lifespan of the battery albeit by a small amount.

I believe is my battery pack were larger or newer, the 5-amp charger would become end being the most efficient. I’ve now switched to taking my 4-amp charger with me everywhere because it’s quicker, more efficient and because I can plug it in to 110V and 220V outlets (more on that soon).

Things to consider

The rate at which you can charge really depends on a two things: your Battery Management System and how thick your charging wires are.

Your BMS plays a big role in your bike. It balances the individual cells that make up the pack, it prevents over-charging your battery, prevents the individual cells from getting too low, so on an so forth. Another thing the BMS does it determines how fast the battery pack can charge.

In order to charge at 5 Amps, the BMS must be spec’d to allow it. If you tried to charge a battery pack equipped with 2-amp limit on the BMS with a 5-amp charger, the BMS would either shutoff to prevent damage to the battery pack, or in the case of a really cheap BMS, the BMS itself would burn out. In order to charge a battery pack with a 5-amp charger, the BMS on the battery would need to specify a charge rate of 5 Amps or greater. Most Battery Management Systems in PEV battery packs can handle up to 10 Amps unless otherwise stated on the battery pack. Check for specs on your BMS or check with the PEV manufacturer to be sure.

Other than the BMS charging specs, the wiring for the battery pack’s charge port need to be the correct gauge. Most battery manufacturers plan over-head when making battery packs in that they’ll use a wire that is thicker than it needs to be (i.e. BMS can charge at 10 Amps, charging wires can handle 15, charger charges at 2 Amps). I assume this is done to take into account inferior chargers or even unstable electricity in your house. If the charge wires inside the battery pack are too thin it’s likely they would heat up, melt, and potentially brick the BMS.

This chart goes over what gauge wire is correct for different charge rates:

In Conclusion

In short, if you want to be able to charge faster, make sure your BMS can handle a faster charge rate , and make sure the charge wires in the battery pack can keep up! I prefer to use 12 gauge wire for the charging cables in my battery packs. That gives me a good margin of safety no matter how fast I charge my bike or how dirty the power from the wall is or how crappy or potentially broken my charger is.

Available from Danny @ eDriftTrikes.com

Chargers I’m a big fan of are the smart chargers offered by Luna Cycles as well as the Grin Technologies Cycle Satiator. I’ll go into more depth about these chargers as I use them more, but a great feature these chargers offer over other smart chargers is their ability to adjust the charge rate as well as how much they’ll charge your battery. Undercharging your battery is a whole topic of it’s own with it’s own pros and cons, Look forward to future posts about these chargers.

Hi. Will edit this post a bit more, but for the sake of time I’ll keep it brief! We’re doing a toy drive to round out the year, so I am asking everyone to please bring a new and unwrapped toy to group rides! I’ll be collecting them and then will drop them off at one of the many drop off locations in the Bay Area; deadline to get this done is December 19th!

We are very fortunate to have the community and toys that we have and naturally there are many that aren’t as fortunate. Toys 4 Tots organizes, collects and distribute toys to families that find themselves unable to provide their children with gifts for the holidays. I’m a strong believer in the power of community and paying things forward. Although our efforts might not be able to reach everyone in need we can still make a hell of a difference.

I’ve completed planning the last group ride I’ll be putting together for 2020; check out the Group Ride Info page. The last ride of the year will be on Sunday, December 13th, and will take place in San Francisco. We’ll be combining the two different SF routes we rode.

Buy off Amazon!

If you cannot make it to any group rides please reach out to me using any means and we can arrange a pickup OR you can order off Amazon and then have the toys shipped to me.

Matt Cajigal – PEV Collective
1212H El Camino Real #739
San Bruno, CA 94044

Don’t break the bank, in this case I think quantity slightly edges our quality. Basically think of something that maybe you or maybe your child or future child, or a child you know would like to receive. If you need ideas the Toys 4 Tots website has a lot of recommendations.

So a lot of stuff has been done to my bike in the last 6 months. I’ll get to writing about each of them eventually, but a quick lookback/off the top of my head I’ve done:

  • 3-speed mod for Z1s and S1s
  • Phase runner Speed Controller + Cycle Analyst
  • Partnered up with a few companies
  • Filmed the pilot episode of a podcast I’ve been working on

I have yet to write about all of them, but let’s move on and talk about science! In an attempt to find optimal settings for my new controller, and to measure the efficiency and usability of all mods I’ve done I’ve started data logging on my bike. Join me on this journey of discovery as I do the unbelievingly boring and do data analysis on my bike.

Link to the spreadsheet can be found here:
Nomad S1X – Data Analysis

The data input is currently a VERY manual process, but I’m working on getting the data logger that pairs with my new controller and display.

I have only two planned rides for the rest of the year; the information on each can be found on the group ride page:
Ride Details Here

Alright! A lot has happened in the last few weeks, and I have been lagging like crazy on getting to it all.

Group Rides

I’ve been on many rides in the past few weeks:
– SoCal Super Squad Temecula Ride – Temecula, CA
– Coronado After-Hours Ride – San Diego, CA
– Downtown LA Ride- Los Angeles, CA
– Suburban Assault Ride/Killer Klown – Santa Clarita, CA
– #BayAreaSuperSquad Group Ride – San Mateo
– SF Assault/Frank Group Ride – San Francisco
– BaeSk8 2nd Annual Labor Day Sunrise – San Francisco

O_O So many rides, so much video. Oh and speaking of video I have a lot of video to go through and edit, and oh I do videos now!

Here is a video from the Temecula ride; I’m totally lagging on videos right now because I’m still getting used to incorporating 360 videos into my workflow.

I like to edit linearly as well as release videos linearly, so that the videos you see will always be in the order I rode them. I have the San Deigo video just about done and I am looking to upload that this week for you viewing pleasure.

A big shout out to my boy Jay Toreza for pushing me to do more than just blogging. Links to his social media:

YouTube:

https://www.youtube.com/channel/UC5B3T0kmTRbd1Q323CZeCiA


Instagram:

https://www.instagram.com/rydingwithjay/

More about the group rides

Temecula, California: Hot, sweaty, hot, really cool road trip to meetup with the SoCal crew.

San Diego, CA: Warm, humid, relaxing, it was only Jay and myself, but the views were just amazing.

Los Angeles, California: Very hot, Jurrasic Park, ramen, and the most awesome tunnel run ever!

Santa Clarita, CA: Golden hour serenity, perfect riding weather, killer klown will come for us all in the end

San Mateo, CA: record high temps, 30+ riders, visit from the police, really really awesome group ride

San Francisco, CA: Frank visited from SoCal, it was smokey, Seniorie’s pizza is the best, we didn’t make it to Lombard, BBQ and beer afterwards was great.

San Francisco, CA: My foot hurt bad, my brakes were gone, I made it up the hill before sunrise, the bike lane on the bridge was closed, made it back to my car 🙂

Yes these are all non-sequitur, but they’ll all make sense once I release the videos.

Fundraising update

Thanks to my friends and family supporting me through direct donations as well as t-shirt and sticker sales I met my modest goal for $500! I reached my personal donation goal on August 31st and immediately claimed my Great Cycling Challenge Jersey which came in on the 5th! The Jersey is very…flattering on my body, but nonetheless it’s the right size and it is awesome.

Mile Goal

The challenge has officially started and so far I’ve done 85 out of 400 miles. I had originally pledged 200 miles but after looking at the group ride schedule for September I decided I could do better. As a team we’ve completed 177 out of 800 miles, so all in all about 25% of the way to the mile-goal after a week of riding.

Next Group Ride

Our next group ride will be on Sunday, September 20th. More information about the ride can be found here:
Group Ride Info


So before you say…cool just another guy offering the same discount as all the other people WAIT.

I wasn’t originally going to sign up for the Super73 affiliate program, but with all that’s going on with the PEV-related non-profit I started I decided to join the program.

I’m now PROUDLY able to offer a $100 (USD) discount on ANY Super73 Bicycle. What make me different from the other people in the program? Well…half of the commission from the program will go DIRECTLY to the different charities and organizations that my local riding group supports.

We’re supporting a different charity every month, and for the month of September we decided to support The Great Cycle Challenge. This organization contributes towards fighting kids’ cancer. With the support of donors and sponsors, we’ve already raised half of our goal BEFORE THE CHALLENGE EVEN STARTS; our t-shirt and sticker sales have also added a good amount to the fundraising goal. More Info…

Bonus Items

As a special bonus, if you purchase a Super73 using my link, you will also get a Super73BayArea shirt as well as one of our stickers! You will also get a personal shout out in one of my videos or podcasts that are currently in production!

Summary Of What You Get:

  1. $100 of ANY Super73 eBike
  2. Super73BayArea T-Shirt & Sticker (shipped by me)
  3. Video shout out (I will notify you when your shout out will be on the internet)

What To Do:

1. Order a bike using my link (https://www.talkable.com/x/zSLr6w)
2. Reach out to me so I can verify your information (for t-shirt size)
3. Wait for your bike to arrive so you can join the next group ride!

If you are looking for other things to get like protective gear and accessories I put up a lot of information on all the gear that I currently use.

That’s all from me; hope to be riding with you soon!

Before We Start

This article isn’t meant to be a how-to which is why there won’t be many pictures nor will the pictures go into much detail; this article is meant to be informational only, so if you try to do this mod it’d best to ask someone that has in-depth knowledge about electrical systems.

Warnings

Warning: Exposure to RoundUp Weed Killer Can Be Deadly

Using batteries with different voltages and capacities can result in frying the electronics on your bike or worse. Working with batteries can be dangerous and may cause injuries such as burns (both electrical, chemical ), poisoning (from burning battery fumes and fried electronics), and more. You get the picture right?

That’s my warning and I am not responsible if you choose to ignore it 🙂

Let’s Get Started!

Since it looks like a lot of people are liking the 48V mod for the Super73 Z1 I decided to take another look at a dual battery mod on this bike. With a lot of people switching to a 48V setup, something I thought to myself was “What’s going to happen with all the 36V batteries?”

That’s when it hit me to run two stock batteries in parallel in order to achieve more rangw! I had a friend who picked up one of these batteries and when I told him my plan he agreed to let me do the mod on his bike.

Something to note about the Super73 Z1 is the limited range; other than the range this bike is a lot of fun! My friend obtained a stock Z1 battery from someone that did the 48V mod, and his plan was to swap batteries mid-ride. Taking off the seat isn’t difficult, and with enough practice you can do it everything in under 5 minutes, but it just didn’t seem practical enough for me.

Why You Shouldn’t Use Batteries of different capacities

It’s totally okay to run two batteries that have the same voltage even if they don’t have the same capacity. According to battery science (and personal experience), you wouldn’t be able to tap into the extra power of the higher capacity when the smaller battery runs out of juice. This is 99% true but the biggest issue is that the batteries would discharge at rate resulting in a voltage disparity.

Batteries in parallel constantly adjust to each other to maintain an average voltage. When the difference in voltage is high enough, the battery with a higher voltage will send current to the battery with a lower voltage in an attempt to balance things out; this current transfer creates a lot of heat and causes stress (and heat) on the battery discharge cable which is only meant to discharge power (not take it in).

This balancing act is also done on the undamaged side of the Battery Management System whose job is to keep the battery from from being overloaded.

In short to do this mod safely you need to make sure the voltages of the batteries are nearly identical when they are both charged and discharged.

Parts I Used

Stock Super73 Z1 Battery

I chose to use a stock battery because it just seemed easy: I knew it was 36V and I knew the designed capacity was more or less the same as the one in the seat. My friend also bought this 2nd hand battery on the cheap.

Blackburn – Medium Bag

This is what would house the 2nd battery. I’ve never been a fan of this bag on my Super73 S1, but it is a tired and true bag and is used a lot people in the community. It was also the perfect size to accommodate the extra battery.

Anderson Y-Cable

This cable can be used to split one battery into two Anderson connectors which would enable your battery to power the speed controller as well as an additional accessory like a light, or perhaps a USB port for your phone. I chose to use the cable in the opposite orientation so that I could connect the batteries in parallel.

I decided to do a parallel setup because I even though you can just unplug the seat battery and then plug in the 2nd one, this isn’t my style. There are also many benefits range that I will talk about later.

XT30 Connectors & 5.5mm DC Power Connectors

These two connectors were used to add a charging port for the battery using the existing wiring.

Rocker Switch With LED

There is an on/off button in the seat of the Z1 that lights up when pressed and also tells the battery/bms to turn on. I jumped these wires into a rocker switch, because without this switch there’d be no way to charge the battery.

Tools I Used

Wire Crimp Tool & Crimp Style Wire Connectors

Although I prefer soldering, this is only version 1 of this mod. I much prefer to solder wires and connectors together, but this was a quick and reliable way to make wired connections

Heat Shrink Or Electrical Tape

When working with electrical components it’s important to insulate the connections. I used shrink wrap because it looks cleaner and provided additional strength to the wires I connected or joined together.

Electrical tape is just as good of an insulator but can be tricky with thin gauge wires like what come on batteries.

On To The Mod!

The first step in tackling this mod was to create the other end of the charging port so that my friend could use the charger that came with his bike to charge the 2nd battery. Alternatively you can buy a 2nd charger so long as it’s the same spec as the stock Z1.

The XT30 connectors I used came pre-assembled, so all I had to do was strip the bare end of the wires and then screw the wires into the 5.5mm female power connector.

After making the charge port on the 2nd battery I then snipped the 2 pairs of wires going to the switch. I stripped the end of the wires off each and then took the black wire, twisted it together with one of the yellow wires and the crimped on a female spade connector; I repeated the same thing with the remaining red and yellow wires

Next it was a matter of connecting the twisted pairs to the switch and make sure the LED light on the switch turned on.

I was feeling great at this point, so I plugged the charger into the charging port I made, and to my delight the light on the charger went from green to red indicating that the battery was now charging!

I put the battery in the Blackburn bag and then mounted the bag to the bike.

I charged both batteries all the way up and then measured the voltages using a multi meter. At this point I wanted an apples to apples comparison of the range.

The Maiden Voyage

It was my first time riding a Z1 for that long and I was having an absolute blast; I rode along a bike path that follows the San Andreas fault as well as two lakes. I turned on the Strava app to measure my distance and made sure to turn around when I reached 8 miles.

The fun came to an end when the battery went dead; I was able to ride 14.7 miles one one charge. Even though I was a little over a mile away from my car, it did not feel like a walk of shame in any way. I could only think about how happy I was going to make my friend if he could go 25-30 miles. I charged the seat battery back to full after I got home and then plugged the charger into the 2nd battery to double-check and make sure I was good to go for the REAL test.

It was the next day and I picked up my friend so that we could test out the dial battery mod. I showed him how to take off the seat. I connected the single-connector end of the Anderson Y-Cable to the speed controller. Next I connected both batteries to using the Anderson y-cable, and then reinstalled the seat.

Both batteries were switched on, the rear end of the bike was lifter, and then the the throttle was engaged. Success! The rear wheel started turning. I didn’t break the Z1 nor did anything spark or catch fire!

After making sure the connections were seated securely I tucked the power switch and charge port for the 2nd battery into the Blackburn bag. We loaded the bikes and went to the same trail I rode the day previous. I started Strava app on my phone, and then we started riding.

Some of you may be thinking: “Why would you only go 8 miles before turning around if you theoretically doubled the range?” To answer that, it was not because I doubted the mod, but because it was the safer option. This was a practical test in that if we could complete the 16 miles ride it would mean the mod worked (which it did).

We went on the ride and made it back to the car which was a little over 16 miles. The charge light indicator on the throttle stayed green through most of the ride and only dropped to yellow the last 2-3 miles of the ride. Not only that, but the battery didn’t go into overheat/protection like it did on my test ride! The battery had gone into overheat protection mode a few times during my first test.

The battery has over-heat protection that prevents the bike from turning the motor when the battery gets too hot. Heat is the number one killer of batteries and to protect the battery from overheating and potentially melting/burning, the BMS urns off the battery until the BMS is reset or until the battery cools down. This is common if you’re you throttle for a long time or when you’re throttling up a long and steep incline.

The batteries didn’t overheat because the load/heat the batteries were producing were being divided among two batteries. This is not only good for the longevity of the battery, but for the performance as well.

If you’ve ever gone long distances on an eBike, you may have noticed that around 50% battery life the acceleration and speed of the bike decreases a bit. Slower acceleration and lower top speed are all symptoms of your battery getting hot and becoming less efficient. A battery at 50% has to work much harder which generates heat which increases the risk of battery failure and to compensate for that the speed controller may cap the performance in an attempt to lower the battery temps.

In short the batteries stayed at the right temp for the speed controller to say hey we’re not getting too hot so we don’t have to cap the performance!

In Conclusion

All together my friend spent around $300 dollars which effectively doubled his range. I think the cost-benefit of this mod is much better than doing a 48V mod (in terms of range).

I mentioned at the beginning that this is version 1 of this mod; the next version of the mod will be to add a digital volt meter since the battery indicator lights are inaccurate and in my opinion useless; I also plan to perform a little nip-tuck on the wires and maybe incorporate the battery switch and charge port into the bag opposed to having them loose in the Blackburn bag.

The 3rd and final version of this mod will include speed-hacking his controller, so that he can go a bit faster. A lot of people have performed the speed hack to their controller to many degrees of success/

Aside from learning more about battery science, but most of all I was happy that I was able to enable my friend because now he’s able to ride longer which opens up the amount of places he can go on his bike!

If you have any questions about this mod comment below, shoot an email to matt@super73nomad.me, or shoot me a DM on instagram (super73nomad).

It just so happened that the ride was on my birthday okay? I totally didn’t plan it because it was my birthday. We had about 15 people join the ride and boy was it cool! We had a good mix of eBike including Super73s, Jucied, and even a custom build.

Nobody got hurt, everyone was able to complete the ride, and I got to meet a lot of new members of the #BayAreaSuperSquad which is the local group of riders that own Super73 eBikes in the bay area.

I totally forgot to grab my bag of SD cards before going to the ride, so I wasn’t able to record any of the ride. Luckily I was saved by my friends Jay and Moze, Chris, and Kevin.

Check out each of their videos, and don’t forget to click like, subscribe, and ring the bell so you get notifications when they post more ride videos.

Our next group ride is scheduled for Saturday, September 5th. I will be updating the group ride info page this week, and will start circulating the official Facebook events page not too soon after that.

Heads up we’re going to move around the bay and the next ride will be a ring around San Mateo.

Let’s Get Started

So after a year I am definitely tired of spinning my pedals like I was running in a hamster wheel, I decided to switch things up to be more practical.

The following info on crankset length and chainring tooth count for stock Super73 Bikes (taken directly from their website):

Z1: 145mm/36T
S1: 145mm/36T
S2: 125mm/36T
R: 125mm/36T
RX: 125mm/36T

But before buying a new crankset and chainring it’s important to know what those numbers actually mean.

Chrankset Length

Crankset length is basically how long your pedal arms are. Getting a longer crankset will allow you to pedal a bit harder which is bad because you will notice an increase in how hard you have to pedal, but it’s good because you’re assisting your motors more meaning less stress on the motor which prolongs battery life and CAN SLIGHTLY increase range.

Other pros to a longer crankset is that on Super73 bikes that don’t have an adjustable seat, you can get a crank length that better suits your height. One thing to pay attention to with crankset length is how close your pedals will be to the ground.

A longer chainset on a bike as low as the S1 or the Z1 mean that when you lean the pedals will be closer to scrape on the ground. I am switching from a 145mm crankset to a 155mm crankset, so I am increasing the length of the pedal arms by 1.5cm (a very subtle amount).

Common crankset lengths are 160, 165, and 170. A lot of modders in the community often go with a 165mm cranklength because it is readily available and from asking around hasn’t really affected their ability to lean the bike when turning.

Chainring tooth count

Much like crankset length, chainring tooth count affects the amount of effort it take to propel your bike. Increasing your tooth count will increase the amount of force you have to use to turn the pedals, but it also increases acceleration while decreasing the amount effort the motor uses to start up.

On flat ground switching to a larger chainring is barely noticeable especially. Where you’ll notice the biggest difference is starting from a stop on an incline. This can require a bit of effort even with a motor (especially considering my ebike is 70lbs with an additional 215lbs on top); Like I mentioned earlier a larger chainring will require a bit more effort to start on a hill, but at the same time allow your pedaling to dramatically reduce the amount of power the motor has to use to get up the hill.

Chainring tooth shape/profile

A lot of thought goes into the design of all bike parts and the teeth on a chainring are no exception. The shape of the teeth as well as the material that they’re made from affect pedal efficiency, component longevity, pedaling noise, part comparability, etc. My ebike is a moped-style bike and is base of BMW and mini bikes, so I tend to lean towards those style parts rather than other types of bikes.

r/Super73 - Has anyone considered an oval chainring?

Chainring shape also plays a large role in how you pedal your bike. 99.9% of the time (don’t quote me) you’ll see circle chainrings because they are probably the easiest to engineer and manufacture, but there are also oval ones that are supposed to increase the amount of torque on pedal’s downstoke. I was turned onto oval chainrings by a recommended video on YouTube that does mainly mountain biking. I really want to try this down the road, but for now I’m going to stick to the traditional circle

BCD, Bottom Brackets, & Crankset Assembly

What is BCD?

Chainring Bolt Circle Diameter (BCD)

Really Quick, BCD is the diameter of the holes used to join a crankset to a chainring. A 110BCD crankset requires a 110BCD chainring otherwise you won’t be pedaling anywhere fast.

Different types of bottom brackets

The bottom bracket on your bike determines how the crankset attaches to the bike. Your bottom bracket also contains the shaft connecting the two pedal arms as well as houses the bearing that spin the pedals. There are many types like threaded, press fit, , and tapered, but for now we’re going to focus on what’s known as a square-tapered bottom bracket. This is what’s used on my ebike and what I’m used to working on.

(write more Matt…I know you were getting tired around this point)

What to pay attention to when buying and installing parts

After figuring out what kind of bottom bracket you have, you can then start looking at parts. When choosing a crankset and chainring, it’s important to have matching BCD as well as making sure the number of holes used to put the two parts together is the same. There are countless numbers of manufacturers and some of them use 4 holes to attach a crankset to a chainring, some use 5 holes, and others may even press fit or thread their crankset to their chainrings. The moral of the story is to make sure you have matching BCD for the crankset and chainring.

Just as important as making sure you order the right parts, the hardware you need to join them is just as important. There is hardware specifically made for putting the two parts together and making sure the hardware is the correct diameter and length is important. On a single speed bike it is generally safe to get long hardware (common lengths 4,5,6,7mm), but on multi-speed bikes and ebikes you may need to get shorter hardware in order to assemble the multiple chainrings. That’s a talk for another day.

Bike chain

Weather you’re increasing or decreasing the amount of teeth on your chainring you will most likely end up having to shorten or lengthen your bike chain. Having the correct length chain is just as important or even MORE important that keeping your bike chain clean and lubricated. No matter how clean, dirty, expensive, or light your chain is, if you don’t have the proper length chain you’ll either be snapping them or frequently re-attching the chain when it slips off the chainring (basically a bad time).

My Setup

I’ve noticed that a lot of people with the same bike as me end up going with a 165-175mm crankset and a 46t chainring. After reading what they had to say about speed, hill stars, and effort required to pedal I went with a 155mm crankset with a 44t chainring, 110BCD with a square-taper. I use my ebike for both commuting and for going on group rides, so I felt like this combination was a happy medium that would make both more enjoyable.

Pedaling on my bike becomes a bit useless when I hit 16mph. At that speed I’m like a hamster running on a wheel and my pedaling does nothing to assist the bike go faster (pedaling is really only to keep the motor on). Once I install my larger chainring, I hope to be able to fully support the motor up to 28-21mph and still have a good amount of resistance while pedaling. This in turn should make my commute easier and at the same time reduce the amount of stress on my motor and battery.

Parts I Used

I’m not go into detail about the brands I chose, just know that these are the parts I used because they were available, work on my bike, and didn’t cause my wallet to catch fire.

Origin8 Alloy Crank Arm (110BCD/155mm)

Origin8 BMX/Singlespeed/Fixie Chainrings

Origin8 BMX/Singlespeed/Fixie Chainring (110/130BCD/44t)

Aluminum Alloy Chainring Bolts (M8x8.5mm)

KMC K710 Bike Chain (1/2″ x 1/8″ – 112 Links)

Tools

I’ve never been one to pay to have stuff done on my car, in my backyard, or to my bike unless it was something I wasn’t confident I could do myself. If you can afford to have these parts installed make sure you take it to a person or shop that you trust.

There are also a lot of name brand tools that everyone knows and loves, but there are also a lot of generic brand tools that work just as well (and a lot more that don’t). Get what you can afford and if it works for you then it works for you otherwise consider buying a more more quality tool.

In Conclusion (I know right this is a long article)

Your mileage may vary (literally), and your never ever have to agree with me, but something I tend to mention a lot or try to express is that you shouldn’t always get things that everyone says is the best because What works for one person or even many people may not work for you. Get what you can afford, what works for you, and what suits your riding style and riding preferences.

With that said this was really really fun to talk about!

T-Shirts

Not too much to say, but I Just put in an order for the first batch of our group t-shits.

Sizes available are medium, large, and extra large. 2nd batch will include small sizes, and we’ll eventually have options like sleeveless and long sleeves.

This will be in stock on August 14th.

Purchasing A T-Shirt

Like I mentioned above I only ordered 15 shirts to start, so if the size you need is not available I will reach out and will let you know when I’ll be ordering more or refund your money.

If you’re going to pick up a shirt from me at a ride please reach out to me right after you make the purchase and I will refund the shipping cost. Otherwise i’ll ship it to you OR just bring a $20 to the ride or Venmo me at the ride.

Small (Sold Out)
Medium (Sold Out)
Large (Sold Our)
X-Large (Sold Out)
XX-Large (current unavailable)

Front
Back

UPDATE 3/14/2020

T-Shirts are currently sold out, but fret not! New shirts are being printed and will be available soon with slightly different branding 🙂

Stickers

We also have stickers available . I still have a lot of stickers from the first batch of printing with more on the way. The stickers are holographic so they also make decent reflectors!

Stickers can be had for $2 and again you can get them from me at a ride or I can use snail-mail to send these to you.

Purchasing A Sticker

Get them here

I will be putting half of all sales into The Great Cycling Challenge, which is an organization I committed to that is encouraging cyclist to ride to fight back against kids’ cancer.

Details on The Great Cycling Challenge can be found in my previous blog post: